
How to Use Orca YOLO Flow Calibration is a crucial process for ensuring precise extrusion accuracy in 3D printing calibration. This method, integrated into OrcaSlicer, automates the calibration process, allowing users to optimize flow rate settings efficiently. By using the YOLO Flow Test, 3D printing enthusiasts can achieve perfect prints with minimal manual adjustments. Proper flow calibration reduces under-extrusion and over-extrusion, leading to enhanced print quality and consistent results.
What is Orca YOLO Flow Calibration
How to Use Orca YOLO Flow Calibration is an advanced method for fine-tuning the extrusion flow rate in 3D printing calibration. Unlike traditional flow rate calibration, which requires manual adjustments and multiple test prints, YOLO flow calibration automates the process to ensure higher precision and efficiency.
This calibration method is integrated into OrcaSlicer, a popular slicing software, and helps users identify the ideal extrusion accuracy for different filament types. The YOLO Flow Test generates a series of blocks with varied flow rates, allowing users to visually compare the results and select the most accurate setting. By reducing the trial-and-error process, Orca YOLO Flow Calibration ensures better print quality, minimizes under-extrusion and over-extrusion, and enhances the consistency of printed layers.

Why is Flow Calibration Important for 3D Printing
Proper 3D printing calibration is essential for achieving perfect prints. How to Use Orca YOLO Flow Calibration ensures that filament extrusion remains consistent, directly affecting extrusion accuracy, layer adhesion, and overall print quality.
One of the most common problems in 3D printing is inconsistent extrusion, where too much or too little filament is deposited. Under-extrusion results in weak, incomplete prints, while over-extrusion causes excess material build-up, leading to rough surfaces and poor dimensional accuracy.
Using YOLO flow calibration, users can precisely adjust the flow rate to optimize extrusion settings. This not only enhances print reliability but also reduces filament waste. A well-calibrated flow rate improves the printer’s ability to produce smooth, strong, and accurately dimensioned parts, making it an essential step for any 3D printing enthusiast or professional.
Laufey Age: How Old Is the Icelandic Jazz Star
Preparing for YOLO Flow Calibration in OrcaSlicer
Before starting How to Use Orca YOLO Flow Calibration, ensure that you have all the necessary tools and that your printer is in optimal condition. Here’s what you need:
- A 3D printer capable of running OrcaSlicer.
- A suitable filament, such as PLA, ABS, or PETG.
- The latest version of OrcaSlicer software.
Preparation Steps:
- Clean the nozzle – Any clogging or debris can interfere with accurate extrusion accuracy.
- Check filament loading – Ensure that the filament is properly fed into the extruder.
- Verify printer settings – Check temperature, bed leveling, and E-steps to avoid unnecessary errors.
- Update firmware – Keeping your 3D printer firmware updated ensures compatibility with the latest calibration techniques.
Accessing the YOLO Flow Calibration Tool in OrcaSlicer
To begin How to Use Orca YOLO Flow Calibration, you need to access the YOLO Flow Test in OrcaSlicer. Follow these steps:
- Open OrcaSlicer and select your 3D printer profile.
- Navigate to the Calibration tab in the software.
- Click on the YOLO Flow Test to generate the calibration model.
- Adjust basic settings based on your filament type and nozzle size.
- Save and prepare the G-code for printing.
For new users, exploring the OrcaSlicer calibration interface can be overwhelming, but the YOLO flow calibration tool simplifies the process, allowing for quick adjustments with minimal manual input.
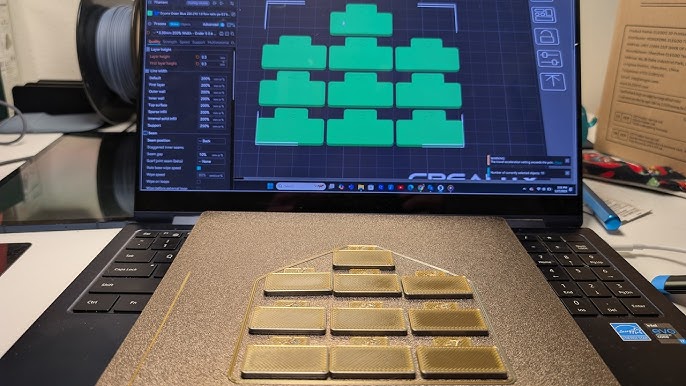
Printing the YOLO Flow Test Model
Once the YOLO Flow Test model is generated, it needs to be printed to evaluate flow rate settings. OrcaSlicer automatically creates a flow rate test print, consisting of blocks with incremental flow adjustments.
Printing Steps:
- Load the G-code onto your 3D printer.
- Start the print and monitor the process to ensure smooth extrusion.
- Allow the print to complete and cool before analysis.
The printed model will showcase multiple blocks with different flow rates. Your task is to determine which block exhibits the smoothest layer adhesion without signs of over-extrusion or under-extrusion.
Sukihana Age: Her Real Birth Year & Life Story Revealed
Analyzing the YOLO Flow Test Print
After printing, closely examine the flow rate test print to determine the best settings for your 3D printer. Look for:
- Under-extrusion – Gaps or missing layers indicate insufficient filament flow.
- Over-extrusion – Excess material buildup leads to rough, uneven surfaces.
- Optimal extrusion – The best flow rate results in smooth, consistent layers.
Identify the block with the most uniform surface and take note of the flow rate modifier associated with it.

Calculating the Correct Flow Rate
Using the chosen flow rate modifier, apply this formula to determine the optimal extrusion accuracy:
New Flow Rate = Current Flow Rate × (100 + Modifier) / 100
Example Calculation:
If your current flow rate is 0.95, and the chosen block has a +5% modifier:
New Flow Rate = 0.95 × (100 + 5) / 100 = 0.9975
Apply this adjustment in OrcaSlicer to achieve precise flow calibration.
Common Mistakes and Troubleshooting Flow Calibration Issues
Some common issues users face while performing How to Use Orca YOLO Flow Calibration include:
- Misreading test results – Selecting the wrong flow rate modifier can lead to extrusion accuracy problems.
- Incorrect filament settings – Ensure the filament type matches the preset in OrcaSlicer.
- Nozzle clogs – Even slight blockages can cause inconsistent extrusion.
Troubleshooting Tips:
- Re-run the YOLO Flow Test if the results seem inconsistent.
- Adjust temperature tuning to see if heat variations affect flow.
- Clean or replace the nozzle if printing issues persist.
Advanced Tips for Achieving the Best Print Quality
To further optimize your 3D printing calibration, consider these advanced tips:
- Temperature tuning – Adjust nozzle temperature for better extrusion accuracy.
- E-steps calibration – Fine-tune extruder steps for better flow control.
- Use different filaments – PLA, PETG, and ABS require different flow rates.
Combining these techniques with YOLO flow calibration ensures consistently high print quality.
Frequently Asked Questions about How to Use Orca YOLO Flow Calibration
What is Orca YOLO Flow Calibration?
Orca YOLO Flow Calibration is an advanced method integrated into OrcaSlicer that helps optimize extrusion accuracy and flow rate settings for 3D printing. It automates the calibration process, reducing the need for manual tuning.
Why is flow calibration important?
Proper flow calibration ensures perfect prints by preventing under-extrusion and over-extrusion, leading to improved print quality and dimensional accuracy.
How do I access the YOLO Flow Calibration tool in OrcaSlicer?
Open OrcaSlicer, navigate to the Calibration tab and select YOLO Flow Test to generate and print the calibration model.
What are the signs of incorrect flow calibration?
Under-extrusion leads to weak, incomplete prints, while over-extrusion results in rough surfaces and excess material build-up.
How often should I perform flow calibration?
It is recommended to calibrate whenever switching filament types, changing nozzles, or noticing issues in print quality.
Can YOLO Flow Calibration work with all filament types?
Yes, but results may vary. Adjustments might be needed for different filament types, including PLA, PETG, and ABS.
How do I apply the correct flow rate settings?
Use the formula: New Flow Rate = Current Flow Rate × (100 + Modifier) / 100, then update the settings in OrcaSlicer.
What shouldI do if my prints are still inaccurate after calibration?
Try temperature tuning, E-steps calibration, or cleaning the 3D printer nozzle to ensure accurate extrusion.
Conclusion of How to Use Orca YOLO Flow Calibration
How to Use Orca YOLO Flow Calibration is an essential process that improves extrusion accuracy, enhances print quality, and minimizes common 3D printing calibration errors. By following the steps outlined in this guide, users can efficiently calibrate their 3D printer and achieve consistently precise prints.
Regularly running the YOLO Flow Test ensures that your flow rate settings remain optimized, reducing material waste and preventing print failures. Combining temperature tuning, E-steps calibration, and different filament types further refines your printing process.
For continuous improvement, experiment with various calibration techniques, engage in 3D printing communities and stay updated with the latest advancements in OrcaSlicer calibration. Mastering How to Use Orca YOLO Flow Calibration will help you produce professional-grade prints and maximize the potential of your 3D printer.